Sunday, April 29, 2012

"The Rings Please...."

You tube strikes again.  I am telling you, having youtube.com as a source of inspiration and a tutorial guide is awesome.  As a personal touch for the wedding, I want to do a few DIY items but nothing too grandiose. I know my limitations and skill set so I wanted to do a few simple items that would not only look good but also save me money.  This is where youtube.com comes to the rescue.  Just type in what item it is you want to make and there are a myriad of video tutorials (some better than others) for your choosing.   

I figured a ring pillow would be something easy for me to make.  I took home economics in high school and sewed two pillows. Granted I also forgot much of the sewing techniques I learned so many years ago BUT I recently signed up for a weekly sewing class at the local Catholic church, so my confidence in amateur sewing has increased.  A ring pillow was right up my skill 'alley', so I took to youtube and found a tutorial for a simple (yet pretty) no sew ring pillow. I followed the tutorial BUT decided to sew the pillow instead. The results are amazing, if I do say so myself.

For a heart pillow (my theme is two hearts): trace a heart on a piece of computer paper, then place the heart on the fabric and cut.

Attach bobby pins to stabilize (prevent from moving, making it easier to sew) the 2 pieces of fabric, then sew together with a simple stitch. Sew on the INSIDE of the fabric as you need to flip it over.

My mother in law showed me this trick of cutting mini pieces at the edge of the fabric to make it smoother once I turned the pillow over. Make sure to leave a little opening for stuffing. As an added touch, I sewed the pillow using a sewing machine, which is not as intimidating as it seems. This allowed me to remove the simple stitching.

Flip pillow over, then stuff.


After stuffing, attach lace with hot glue around the pillow for a more finished look... also makes it look more like a ring pillow.

Attach ribbons anywhere on the front of the pillow for a little bit of 'pretty' and also for the rings.

Voila! The finished ring pillow.  Because my mother in law already had the materials, the pillow only cost me the price of the ribbon (so a whopping .30 cents or so).  I saw a nice regular square pillow with a heart box attached for the rings for about $7 that I was tempted to buy. I am so glad I decided to make my own pillow, because I ended up saving over $6 bucks AND the pillow goes perfectly with my theme. Not to mention, it means so much more because I made it. 

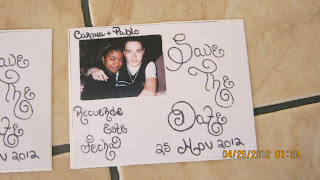
Save This Date


Save the dates went out this weekend for the wedding! I know they aren't a necessity but, they were so much fun to make and even 'funner' to hand out.  I made 10, handed out 7 and have 2 more to give away. I am debating if I should make more and sent to family in Boston. We'll see.

I had another idea for the save the dates entirely, but in the end did something even simpler and cheaper than the original idea. These save the dates cost about $5 and I went with an older photo of Hubby and I. I figured what a great way to showcase how long we've been together, like a timeline almost of our enduring 14 year love affair. :)

Princess's 5th Birthday

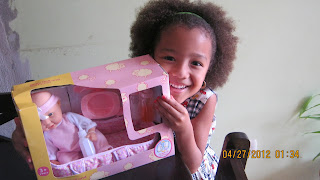
Princess turned 5 and she could not have been any happier to do so.  All week she kept talking about her birthday, about being a big girl and about finally being 5 (something she had been looking forward to since last year, right after she turned 4 LOL).  

I promised her I would take her to get a professional manicure for her birthday and so off we went. 

April 26: her birthday

Getting ready to get her nails done


All done... look how pretty. She was on cloud 9 the rest of the day :)


I took her to Mas x Menos and let her pick out a toy for her birthday present. She chose this baby doll set.

Having pizza


Time for cake!

So Princess had been asking to get her hair flat ironed for a while. Well, my in-laws got her a flat iron for her gift and I decided to grant her wish for her birthday. I mean after all, you only turn 5 once right?


Party time!


Pinata


After the party, we all headed out to the movies for some good 'ole family fun.


Monday, April 23, 2012

THE Dream Dress

I found my dress!!!!!! I cannot believe it! I am still on cloud 19!!! After my last (and first) dress shopping appointment, I was not really looking forward to more fittings. To be honest, I was over the whole experience and didn't have hope in finding a dress I would love. I actually thought I would be looking for months before I found something I could be happy with. Not to mention the prices. They are so insane, I was worried I wouldn't be able to afford something in my budget.

I thought about renting a mediocre dress (after all what will I do with the dress after the wedding?) But the whole idea of buying a dress that was mine to keep was still in the back of my mind of something I wanted to do.

It was by chance I found my dream dress. I went back to the dressmaker's shop to pick up the quote for a custom made dress, when I saw a wedding dress on a mannequin that I liked. I asked her assistant to let me know the price of the dress in hopes it would be cheaper than the quote I was given for a dress made from scratch.

After a few days, the dress was still there and each and every time I saw it, I fell more and more in like with it. So one day, I went in and talked to the owner and let her know the quote she had given me was too high, what my budget was and asked about the already made dress she had for sale. When she told me the price, I couldn't help but hope that my strong like for the dress could turn into love if I just tried it on. So I made an appointment for a fitting.

After I put on the dress... it just felt RIGHT! I did not want to take it off. It was perfect (if a little too big). It was THE dress. The one I had in my mind of what I wanted. I couldn't believe I had found my dress and I could not believe I could finally stop looking for the one because I had found it, in a local seamstress's shop. After the shock and awe, I bought the dress right then and there.

The dress has cap sleeves (yes, I never wanted strapless). The sleeves criss-cross in the back with 4 straps. It is a princess dress and light and fluffy but not too puffy. It is simple yet still elegant. I cannot wait to get married in it.

Now, the dress is not ready yet. My payment was a deposit, and then I pay a minimum amount every couple of weeks. The total price of the dress includes all the alterations, a cleaning and a good pressing and a crinoline to make the skirt fuller and give it more of a ball gown princess effect. To be honest, there was only one minor issue that needed fixing on the dress, so I am anxious to see how it fits after all the work is done. And I am glad it didn't need too much done to it at all.

I am just so excited to have finally found a dress I love, my dream dress without having to settle or paying an astronomical amount of money. Having the dress makes the wedding seem so much more real.


My dream dress... I felt like a princess!

Saturday, April 14, 2012

Dress Shopping

My very first experience trying on bridal dresses was today and I have to say, I was not disappointed. It was a little sad as I went dress shopping by myself BUT it was nice to not have a bunch of opinions to deal with, so my own voice could be heard as far as what I liked about each dress and what I wanted. But it would have been nice to have someone, anyone with me, for my very first bridal dress experience. It is such a monumental moment and one of the very few times I felt like a bride (a poofy white dress can do that). I kinda thought I would have someone there with me to share it with.

Anyway, the attendants were super nice. I arrived to my appointment at Marian Daniels 15 minutes early and was attended to immediately. I sat in the room for a few minutes selecting dresses from the stores catalog and then another few minutes while the sales attendant pulled dresses for me from their collection.

I was very shy at first, since I had to be topless (I had the crinoline on) while the attendants helped me in the dresses. But it was fun playing dress up. And I am thankful I brought my camera because the sales associate took pictures of me in each dress and of the details of each dress as well.

I have to say, I loved all the dresses. But of course, I have my favorites. While at the salon, the second dress I tried on was the front-runner, but as I look at myself in the dress in photos, I am not loving it as much anymore. It just looks a little too "prom-ish" to me. The 4th dress has now taken the top spot; a dress I initially thought was too puffy and heavy. Browsing through the photos, it's the one that looks the best on me and fits my princess ideal (I was in love with the top of the dress from the minute I saw it). However, it is also the most expensive.

As this was my first bridal salon experience, I assume I have many more dress fittings in my future. I just need to go armed with a budget, so I am not trying on dresses I can't afford.

Dress #1: really liked the drop waist

Dress #2: initially my favorite, now not so much!

Dress #3: nice... love the top and the details on the bottom

Dress #4: didn't think I liked it being so 'poofy' but the top is HOT!!! And I love how it looks on me : )


Dress #5: not my favorite. It is the cheapest but it does not have that WOW factor

It's also funny that I have to note I was dead set against strapless dresses. I am not super blessed in the boob department and didn't want to worry about hiking my dress constantly as I danced the night away. BUT I think the strapless dresses look hot (and I can always add straps if I still need to).

Wednesday, April 11, 2012

Wedding Planning Website

http://www.mywedding.com/pablolovescarina/

Almost like having a wedding planner (well not quiet) but it keeps me organized. I am a diary keeping kinda gal, so having this site is great. Check it out.

Card Box

So all this wedding planning has led me to quiet a few wedding planning sites and message boards. From these, I've gotten a myriad of ideas from other soon to be and current brides for my own wedding.
With so many new and trendy wedding ideas out there, it's hard to narrow down what is essential for the wedding and what is just not. I have been planning my wedding mentally for years so I already had ideas of my own. But some of the newer ideas just seemed to fit who I am now as a woman as opposed to who I was back then (the young naive me). So it was only natural I started looking for something new.

One of the many ideas I fell in love with was the wedding card box idea. There are so many different versions of the card box (a safe place for guests to put cards or envelopes with money for the bride and groom), but I loved the DIY versions (mainly because they are cheaper and more my style: artsy and crafty).

I looked up a few tutorials online and scoped out a few pics from other DIY Brides for ideas and went to work on a simpler version to fit my taste, style and budget. I finished the box today (it only took a couple of hours...less than 2 I'd say). It didn't come out exactly how I wanted it to, but I am pretty proud of it and love the look regardless. I know guests will like it too.

The finished product: I initially wanted the box to have 3 tiers and to look like a wedding cake, but I think the finished product is just as nice.

All it's missing is 'CARDS' placed on the front so guests won't confuse the box with a gift.

In progress: took me some time to find the right kind of wrapping paper.

I had to cut holes in the 2 boxes (a slit on top for the envelopes and cards to go through and a hole at the bottom of one box and the top of another for the cards to fall into).

While most brides that I saw used round boxes from a hobby store, I just used two boxes I had lying around at home.


Monday, April 9, 2012

Easter

I did not forget Easter this year, although I kinda wanted to. But Boobie (I'll call him P from now on, since at 12 he seems too old to be my Boobie anymore) was looking forward to our annual traditional scavenger egg hunt. He was so excited about it, I could not disappoint. Plus there was Fatty and Princess to consider as well.

I literally put Easter together in one day. No advanced planning necessary. I had our plastic eggs from previous years that we save just for the occasion. I had a few pictures of hiding places I had cut from magazines. All I had to do was stuff each egg with a picture clue and hide the eggs all over the house and yard. I did that while the kids were in the shower.

Next, I had to run to the store for a few goodies... after all, what would the kids be 'hunting' for? Plus, I had to fill those baskets with something. My budget for Easter was tight this year due to other financial obligations (notably the wedding) so I could not spend too much. Luckily, my kids are so blessed, they don't need much. They are bombarded with toys so I decided to forgo toys this year (and probably for the years to come). Instead I filled their baskets with:
Papitas (cheese puffs)
Condensed milk cereal treats
Choys chocolate bars with rice crispies
Gummies (they never get these so this was a real treat)

And the prize at the end of the hunt: Chocolate kinder Surprise eggs filled with a mini toy. I got Toy Story for P, Mickey Mouse for Fatty and Disney Princess for Princess. They gobbled up the chocolate eggs and played with the mini toy surprises for the most of the day.

It was another successful Easter... everything was a hit. And I was super happy to give my kids such a fun day. I was so glad I didn't 'skip' Easter.

Hubby, for his part, went out and got ice-cream and a family movie. It was a perfect Sunday.

Venue Down!

So the ceremony venue was not a big deal to handle. I finally decided to have it in our backyard. After-all, we have a pretty nice yard and it's pretty big too. So why not? It took me a while to warm up to the idea, I have to admit, but the more I thought about it, the more the idea seemed genius. I don't have to pay a fee to use my own backyard (all I need are a couple of rental chairs and I am good to go.) I am sure hubby will spruce the yard up for the big day. Just hope it doesn't rain.


As for the reception venue... well it took a little longer than I would have liked, but we finally booked a venue for the reception portion of our wedding. See, I was still in fantasy land and wanted the whole wedding in one place (to make it easier on our guests and on us). But all those kinds of 'all in one' wedding sites were a bit out of our price range, so I started looking at reception halls instead (I could rent a space and do with it what I will). I found Sala de Eventos San Antonio on a yellow pages type of web site for Costa Rican wedding vendors. It was perfect. BUT, pictures do tell a thousand lies so I had to go and see it for myself.

Well, the pictures did not do it justice. At first, I was not (and still am not) impressed by the outside. I was a bit turned off actually and prepared for the worse (and for my search to go on and on and on ....). Well, I walked into the space and it blew my mind and literally took my breath away. It was gorgeous. Don't get me wrong, it's not super fancy or anything (that is NOT the look we want), but for the price and the proximity, it felt like it was too good to be true. I mean the space is HUGE. Big enough for 250 people (so yeah, my 150 guests will have plenty of space.


Also, not only is the space huge, it's amply equipped. There are 5 (yes, FIVE) bathrooms, a room upstairs (loft style) for the bride, and disco/DJ lights. Plus a kitchen at our full disposal. It could not have been more perfect. But for some reason, I waited and held out for something.... more! I guess the one downfall was the outdoor space. There is none... just asphalt to park a few cars. No garden, no frills, nothing.

I thought, if I could find this space with an outside I could boast about, then I'd be golden. But there was nothing. And I had to tell myself I was not settling. I had found perfection already. After deciding on having the reception in our backyard, San Antonio seemed more and more enticing. I dreamt about it at night. I day dreamed about it during the daytime. I pictured my wedding there, my guests, the set-up, everything. And even though it's an affordable option, I did not want to picture myself anywhere else even if I had the money to splurge. So I made the decision to finally book the space and reserve my date officially. I am so excited.

The one caveat: the date hubby wanted, which was a Saturday, was already booked. So I booked on my original date, our 14 year Anniversary, November 25, 2012.